# \[API] How to Set up and Use OAuth Authentication Using WP REST API (ok0

## How to Set up and Use OAuth Authentication Using WP REST API
 [Owais Alam](https://www.cloudways.com/blog/author/owaisalam/)
November 30, 2016 8 Min Read
When it comes to [WordPress REST API](https://www.cloudways.com/blog/comprehensive-introduction-rest-api/), OAuth is the [most common authentication handling provider](https://www.cloudways.com/blog/setup-basic-authentication-in-wordpress-rest-api/).
When OAuth authentication is in place, users first login through the WordPress login form that is in use on the website. however, this login also authorizes the clients to handle requests on their behalf and all subsequent requests are validated through OAuth tokens. Those tokens are also used to manage all API access requests. This access could be revoked at any point.
Perhaps, the most important use of the OAuth authentication process is the safe process of handling REST API requests without exposing the credentials of the users. This is particularly important in the case of production servers where credentials are often exchanged. In such scenarios, OAuth authentication is used to provide a safe procedure for handling frequent login credentials request.Table of Contents
* [Traditional Versus OAuth Authentication](https://www.cloudways.com/blog/setup-and-use-oauth-authentication-using-wp-rest-api/#traditional-versus-oauth-authentication)
* [OAuth Authentication Workflow](https://www.cloudways.com/blog/setup-and-use-oauth-authentication-using-wp-rest-api/#oauth-authentication-workflow)
* [Installation of OAuth Authentication](https://www.cloudways.com/blog/setup-and-use-oauth-authentication-using-wp-rest-api/#installation-of-oauth-authentication)
* [Assessing the Availability of the OAuth API](https://www.cloudways.com/blog/setup-and-use-oauth-authentication-using-wp-rest-api/#assessing-the-availability-of-the-oauth-api)
* [Creating and Managing Applications](https://www.cloudways.com/blog/setup-and-use-oauth-authentication-using-wp-rest-api/#creating-and-managing-applications)
* [Client CLI to Generate OAuth Credentials](https://www.cloudways.com/blog/setup-and-use-oauth-authentication-using-wp-rest-api/#client-cli-to-generate-oauth-credentials)
* [HTTP Client to Generate OAuth Credentials](https://www.cloudways.com/blog/setup-and-use-oauth-authentication-using-wp-rest-api/#http-client-to-generate-oauth-credentials)
* [Acquiring Temporary Credentials](https://www.cloudways.com/blog/setup-and-use-oauth-authentication-using-wp-rest-api/#acquiring-temporary-credentials)
* [User Authorization](https://www.cloudways.com/blog/setup-and-use-oauth-authentication-using-wp-rest-api/#user-authorization)
* [Token Exchange](https://www.cloudways.com/blog/setup-and-use-oauth-authentication-using-wp-rest-api/#token-exchange)
* [Sending a Test Authenticated Request](https://www.cloudways.com/blog/setup-and-use-oauth-authentication-using-wp-rest-api/#sending-a-test-authenticated-request)
### Traditional Versus OAuth Authentication
In order to understand the significance of OAuth authentication, it is important to understand the traditional and OAuth authentication model.
In the traditional authentication model, there are two key entities; Client and Resource/Service Provider. The client could be a web app, service or a user, while the Resource/Service Provider has the desired resources or services in an access-restricted environment.
When the Client requires a particular resource, it authenticates itself with the Resource Provider by providing appropriate credentials. While this is a simple process, there is also a huge risk of a security breach.
In contrast, OAuth authentication model is slightly more complex with three entities; Client that acts on behalf of the user, User who requires access to a resource, and the Server that maintains the resource.
Since there are three entities, the process is known as three-legged authentication. However, in cases where the Client and the User are the same entities, the authentication process becomes two-legged authentication.
### OAuth Authentication Workflow
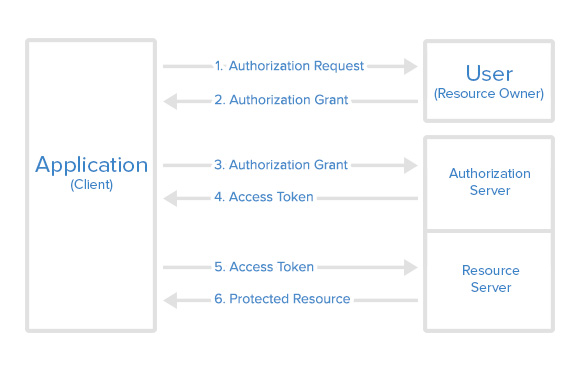
* The *Client* requests the *User* authorization to access the *Server*.
* If the *User* grants the request, the *Client* receives the right to proceed further.
* The *Client* presents its identity and the mandate from the *Client* to the A*uthorization Server* (API) and requests a token.
* In the event of successful validation of the identity and mandate, the *Authorization Server* (API) issues an access token to the *Client*. At this point, the authentication is complete.
* Next, the *Client* approaches the *Server* to request a particular resource. At this point, the *Client* also sends the access token to the
* If the access token is validated, the *Server* grants access to the resource requested.
The Client originates the signed request for a Request Token. This request is also known as Temporary Credentials. The request is sent to the relevant endpoint URI. This request comprises of several important parameters:
* **oauth\_consumer\_key**: This key identifies the application originating the request.
* **oauth\_timestamp**: Servers use this timestamp for optimization of nonces storage.
* **oauth\_nonce**: This is the unique application generated token for every individual request.
* **oauth\_signature**: This important part of the API request is the hash of all components of the request and some OAuth values.
* **oauth\_signature\_method** : The OAuth plugin offers a single signature method: HMAC-SHA1.
* **oath\_callback** : The URL where the user is redirected after authorization. The request is verified and a Request Token with the following parameters is issued.
* **oauth\_token**: This is the application token that is stripped from the response of the Authorization Server. This token is then sent to the API server.
* **oauth\_token\_secret**: This is similar to the user password. The request is then authorized by the Client. For this, a request URI is created and **oauth\_token** is added to the server authorization endpoint URI. The User authorizes sending this request by providing appropriate credentials.
In the event **oauth\_callback** URI is available in the first step, the server redirects to the URI with the following parameters added to the query string:
* **oauth\_token**: already have the token.
* **oauth\_verifier**: verifies the identity of the resource owner to the client.
If the **oauth\_callback** URI was not provided in the first step, then the server sends the value of **oauth\_verifier** so that the resource owner could inform the client manually.
After receiving **oauth\_verfier**, the client requests the server for token credentials. This takes the form of a request to the Token Request endpoint URI. This request contains the following parameters:
* **oauth\_token**
* **oauth\_verfier**
* **oauth\_consumer\_key**
* **oauth\_signature**
* **oauth\_signature\_method**
* **oauth\_nonce**
* **oauth\_version**
### Installation of OAuth Authentication
In the context of WordPress,OAuth authentication is implemented by installing the OAuth authentication API for WordPress. This is based on OAuth 1.0a specifications and actually extends these specifications by an additional parameter **wp\_scope.** This parameter is sent to **Temporary Credential Request** endpoint.
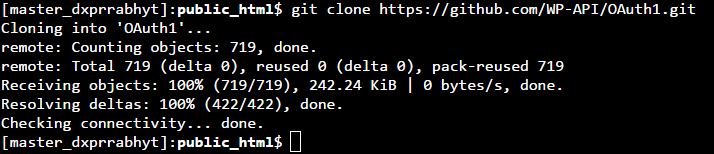
The plugin is available on [Github](https://github.com/WP-API/OAuth1) from the WP REST API team. At the moment, version 4.4 and later are supported.
I will start the process of cloning the plugin by moving to **/wp-content/plugins/** directory:
1. git clone
After the download finishes, activate the plugin through WordPress CLI:
1. wp plugin activate OAuth1
If you do not wish to use WordPress CLI, you could go to the WordPress Admin >> Plugins and activate the plugin from the menu. Alternatively, you can also activate it by navigating your browser to your WordPress admin plugins section if you don’t wish to use WP CLI.
### Assessing the Availability of the OAuth API
Before I initiate the OAuth handshake, I will first check whether the API is enabled on the server. This is done by sending a simple **GET** request to the **/wp-json/** endpoint and then analyzing the response sent by the server.
1. GET
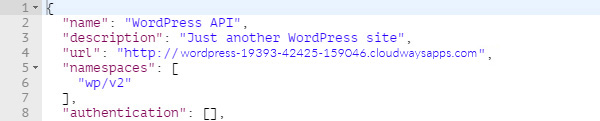
This will return a JSON response as follows:
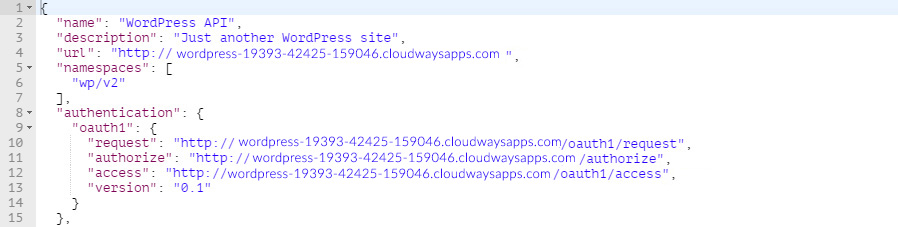
My focus here is the **oauth1** value in the **authentication** property value. This object has the following properties defined:
* **request**: the Temporary Credential Request endpoint
* **authorize**: the Resource Owner Authorization endpoint
* **access**: the Token Request endpoint
* **version**: the version of OAuth being used
If the OAuth API is not enabled for a site, the server response would contain an empty **authorization** property value.
### Creating and Managing Applications
The first step is to make sure that the OAuth1.0 plugin is installed and activated correctly.
Next, I can create and manage applications by going to the WordPress Admin >> Users >> Applications.
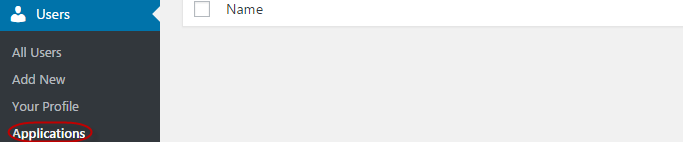
On this **Registered Applications** page, I will register a new application by clicking the **Add New** button and then filling in the following three fields:
1. **Client Name:** The name of the Client that appears on the **Authorized Applications** section, and during the authorization process.
2. **Description**: The optional description of the Client.
3. **Callback URL**: The callback URL is used when generating temporary credentials.
Once created by clicking the **Save Client** button, the **Client Key** and **Client Secret** parameters will appear at the bottom of the page for this particular client.

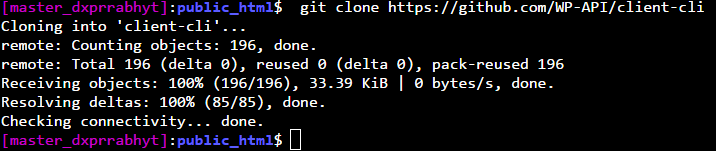
I will now clone the repository on the client by running the following command:
1. git clone
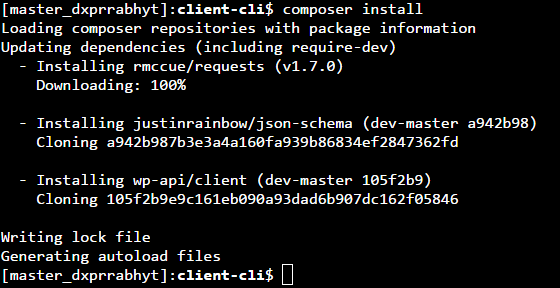
Now navigate into the cloned directory and install package dependencies using Composer:
1. cd client-cli
2. composer install
If all goes well, the command line should show something similar to the following:
### Client CLI to Generate OAuth Credentials
To start the OAuth authorization process, I will first obtain the following parameters from the server:
* **oauth\_consumer\_key**
* **oauth\_consumer\_secret**
This will be generated through the terminal and running the following WordPress CLI command:
1. wp oauth1 add
The **Key** and **Secret** are the **oauth\_consumer\_key** and **oauth\_consumer\_secret** respectively.
Now I need to link the client to the WordPress site. On the client, navigate to the **client-cli** directory (cloned earlier) and run the following command:
1. wp --require=client.php api oauth1 connect --key=\ --secret=\
Replace the URL, the key and the secret in the above command. The output should be like the following:
1. wp --require=client.php api oauth1 connect --key=\ --secret=\
2. Open in your browser:
3. Enter the verification code:
Navigate to the URL given by the server and authenticate by clicking the **Authorize** button:

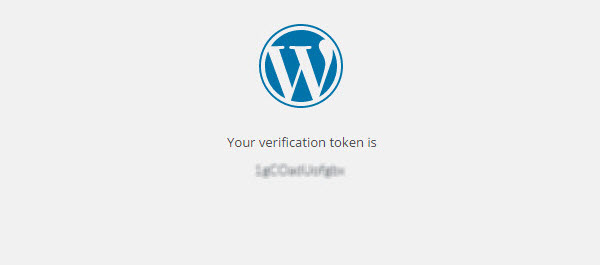
You will be presented with the verification token (or the oauth\_verifier) on the next screen:
Copy the verifier and paste it into the terminal. You will be given a **Key** and a **Secret**, which are basically the **oauth\_token** and **oauth\_token\_secret** respectively:
### HTTP Client to Generate OAuth Credentials
Because the OAuth 1.0a server plugin follows the standard three-legged flow, generating OAuth credentials involves the following steps:
* Acquisition of temporary credentials
* User authorizations
* Token exchange
### Acquiring Temporary Credentials
I will send a **POST** request to /oauth1/request endpoint to get temp credentials. Note that this endpoint should be auto-discoverable as a server might replace the route on its own.
The **POST** request should include and **oauth\_consumer\_secret** parameters as acquired when registering a consumer for the application. The request might also include the **oauth\_callback** parameter and this callback URL should match the scheme, host, port, and path of the callback URL which was provided when registering the application.
In addition to the **oauth\_consumer\_key** and **oauth\_consumer\_secret** parameters, the request should also include the **oauth\_signature** and **oauth\_signature\_method** parameters.
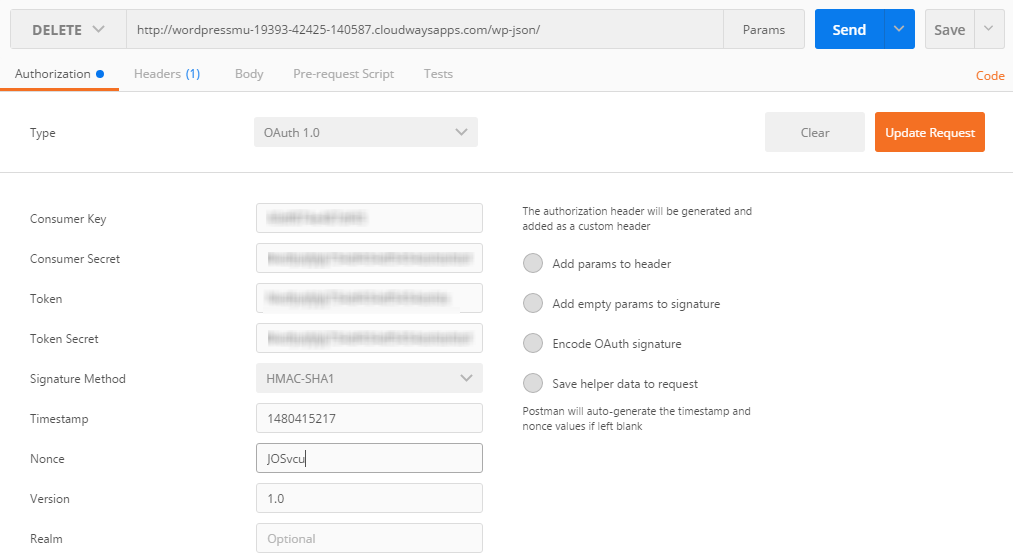
When using Postman, the **oauth\_signature** is generated automatically. I only need to mention the **oauth\_signature\_method** parameter. At the moment, only the HMAC-SHA1 signature method is supported by the OAuth server plugin.
I will now configure Postman to send a **POST** request to the temporary token credentials endpoint. Next, in the **Authorization** tab, select the **OAuth 1.0** option from the dropdown. Fill in the **Consumer Key** and **Consumer Secret** fields with the values provided by the consumer. Finally, check that the **Signature Method** option is set to **HMAC-SHA1**.
### User Authorization
For the user authorization step, I will open the resource owner authorization endpoint in the browser and pass the **oauth\_token** and **oauth\_token\_secret** as obtained in the previous step as query parameters:
1. \\&oauth\_token\_secret=\
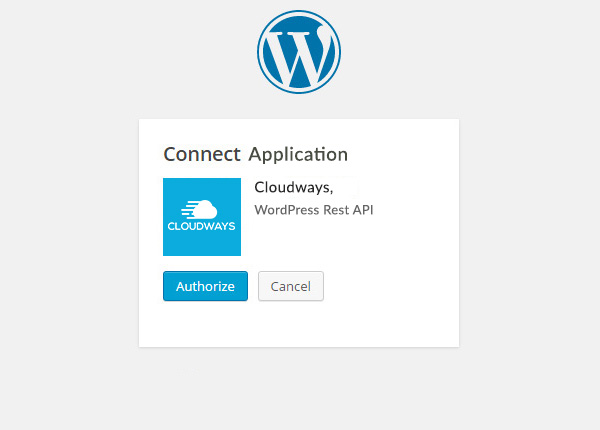
Authorize the application by clicking the **Authorize** button. The next screen will present a verification token. This token will now act as an **oauth\_verifier** token in the next step.
Once the user has authorized the client, the application will appear under the **Authorized Applications** section on the **Users > Your Profile** page.
### Token Exchange
By using the **OAuth 1.0** option again in the **Authorization** tab, fill in the fields for **Consumer Key** and **Consumer Secret** with values as provided by the consumer. In the fields for **Token** and **Token Secret,** insert the value **oauth\_token** and **oauth\_token\_secret** parameters (temporary credentials).
As I can also pass parameters in the URL as query parameters, append the **oauth\_verifier** parameter to the URL as follows:
1. \
With all the parameters in place, send the request by clicking the **Send** button. If all goes well, the server will return a **200 – OK** status code along with the response body containing **oauth\_token** and o**auth\_token\_secret** parameters.
1. oauth\_token=\\&oauth\_token\_secret=\
At this point, the temporary tokens acquired earlier are discarded and can no longer be used.
The new **oauth\_token** and **oauth\_token\_secret** parameters are the OAuth credentials that you can use in the client for generating authenticated requests.
### Sending a Test Authenticated Request
Now that I have the token credentials, I will send a test request to the server using the Postman. The request will require the following parameters:
You will need to have the following before you get started:
* oauth\_consumer\_key
* oauth\_consumer\_secret
* oauth\_token
* oauth\_token\_secret
Select **OAuth 1.0** from the drop-down under the **Authorization** tab in Postman.
Once you have filled all the fields, click the **Update Request** button. Check **Add params to header** option to send the parameters in the header of the request instead of appending to the query string.
If the request is successful, the server will send a **200 – OK** status code.
### Wrapping up!
In this tutorial, I discussed how to setup OAuth authentication API for WordPress on a server, and how to use the HTTP client for obtaining token credentials. If you discover an issue in the code or would like to add to the discussion, please leave a comment below.
#### Share This Article
*
*
*
*
*
*
*
**Start Growing with Cloudways Today!**
We never compromise on performance, security, and support.[TEST NOW](https://platform.cloudways.com/signup?utm_source=wordpressBlog\&utm_medium=bottomCTA\&utm_campaign=default)
**Owais Alam**
is the WordPress Community Manager at Cloudways - A Managed [WooCommerce Hosting](https://www.cloudways.com/en/woocommerce-hosting.php) Platform and a seasoned PHP developer. He loves to develop all sorts of websites on WordPress and is in love with WooCommerce in particular. You can email him at
---
# Agent Instructions: Querying This Documentation
If you need additional information that is not directly available in this page, you can query the documentation dynamically by asking a question.
Perform an HTTP GET request on the current page URL with the `ask` query parameter:
```
GET https://learnphp.gitbook.io/learnphp/wordpress/api-how-to-set-up-and-use-oauth-authentication-using-wp-rest-api-ok0.md?ask=
```
The question should be specific, self-contained, and written in natural language.
The response will contain a direct answer to the question and relevant excerpts and sources from the documentation.
Use this mechanism when the answer is not explicitly present in the current page, you need clarification or additional context, or you want to retrieve related documentation sections.